Most Worn Lipsticks/Glosses
Hi there! I hope everyone enjoyed the holidays as much as I did. Now off to a new start of what hopes to be a great New Year!
I have always had a love affair with lipstick. I am completely obsessed with it. I love the coverage, the feel, the different textures, the longevity of a lipstick and what may seem a bit creepy to some....simply putting it on! There is just something about pulling out that red CHANEL lipstick in that luxurious black and gold tube that makes you feel like you're channeling your inner Coco darling!
Wearing a lipstick as opposed to a gloss just feels very sophisticated to me. It's not that I dislike gloss, but I rarely wear one on it's own because I find that most of them are too sheer and don't provide enough coverage. However, I always put a little in the center of my lip to add a bit of shine but not too much. I find that too much gloss can give a very "lipstick-y" look which I personally don't care for too much.
Below are the lipsticks and glosses that I reach for the most. The lipsticks have good coverage and feel great on the lips. The glosses have really good coverage as well and aren't sticky at all.
I am not the best at swatches, but I wanted to show what the colors like on skin so that you can get an idea of the true color. They are in order of the listings below.


XOXO,
Raven
I have always had a love affair with lipstick. I am completely obsessed with it. I love the coverage, the feel, the different textures, the longevity of a lipstick and what may seem a bit creepy to some....simply putting it on! There is just something about pulling out that red CHANEL lipstick in that luxurious black and gold tube that makes you feel like you're channeling your inner Coco darling!
Wearing a lipstick as opposed to a gloss just feels very sophisticated to me. It's not that I dislike gloss, but I rarely wear one on it's own because I find that most of them are too sheer and don't provide enough coverage. However, I always put a little in the center of my lip to add a bit of shine but not too much. I find that too much gloss can give a very "lipstick-y" look which I personally don't care for too much.
Below are the lipsticks and glosses that I reach for the most. The lipsticks have good coverage and feel great on the lips. The glosses have really good coverage as well and aren't sticky at all.
I am not the best at swatches, but I wanted to show what the colors like on skin so that you can get an idea of the true color. They are in order of the listings below.
Lipsticks
Urban Decay - Protest: Peachy Nude with a satin finish
Urban Decay - Fiend: Medium Pink with a satin finish
Dior Addict - Bobo #530: Sheer Light Coral with a touch of shimmer
Revlon - Berry Smoothie (Lip Butter): Berry Pink with a touch of shimmer and a cream sheen finish
MAC - Ruby Woo: Bright Red with a matte finish
EM Cosmetics - Wow Pink: Bright Pink with a satin finish
Dior Addict - Bobo #530: Sheer Light Coral with a touch of shimmer
Revlon - Berry Smoothie (Lip Butter): Berry Pink with a touch of shimmer and a cream sheen finish
MAC - Ruby Woo: Bright Red with a matte finish
EM Cosmetics - Wow Pink: Bright Pink with a satin finish
CHANEL - Passion: Red with a satin finish
Lip Glosses
CHANEL: Sunset Gold 64: Long wearing Light Gold with shimmer - I think this one may be discontinued :-(
Maybeline - 110 Mirrored Mauve: Highly pigmented Mave Pink
Maybeline - 300 Lavender Lavish: Highly pigmented Lavender Pink
Giorgio Armani - Pink 501: Long wearing Light Coral Pink with a touch of shimmer
Maybeline - 110 Mirrored Mauve: Highly pigmented Mave Pink
Maybeline - 300 Lavender Lavish: Highly pigmented Lavender Pink
Giorgio Armani - Pink 501: Long wearing Light Coral Pink with a touch of shimmer
Giorgio Armani - Pink 518: Long wearing Nude Pink
XOXO,
Raven


 Pixiwoo (
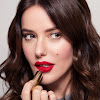 Lisa Eldridge (
 Tanya Burr (
 Monika Blunder (
 Charlotte Tilbury (
 Smashbox Cosmetics (
 MakeupBySona (
 makeupbyeman (
 MakeupByTiffanyD (
 MakeUpByCamila2 (
 blushingpixie (
 RAEview (